
Appendices
Appendix III: Technical Notes for Recording Student Assessment
![]()
Before Recording
1. |
Always remember to mark the video tapes with the date, name of the school and teacher, and class number. You may also speak to the video camera and record the information listed above on tape. If you are using a digital video camera, make sure that there is enough disk memory for the recording. |
During Recording
2. |
To avoid backlighting, avoid facing the video camera towards the windows. |
3. |
Try to use a tripod whenever possible because the video image will be much steadier. |
4. |
Do not select timer or date for the video recording because they may block some of the images when playing the video on screen. |
5. |
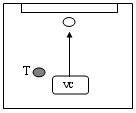
The teacher should sit close to the video camera so that students will look in that direction. |
6. |
If recording individual presentations, try to place the camera directly opposite the presenter. You may set an extended camera microphone / a regular teacher microphone* a few feet away from the presenter. |
7. |
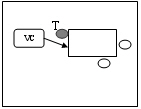
If you are recording pair interactions, try to place the camera to one side of the students, so that both students’ faces can be seen at the same time. Place an extended camera microphone / a regular teacher microphone on the table to capture better sound quality. |
8. |
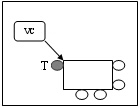
If you are recording small group interactions, try to focus the camera on the one who is speaking and capture everyone’s face as much as possible. Place the extended camera microphone / a regular teacher microphone on the table to capture better sound quality. |
Key: T = Teacher; VC = Video camera
* You may use a regular microphone which teachers use for teaching and place it on a microphone stand or a table to amplify the students' voices for better quality of sound recording. Do not place the microphone directly under a fan or close to an air conditioner. Heavy background noise may be picked up by the microphone if you do so. Do not place the microphone directly in front of the student. The student’s performance (i.e. communication strategies) may be restricted by the microphone.
Before Recording
1. |
Make sure that the audio recorder works, and the batteries are not low. Please bring extra batteries and tapes. If you are using a digital voice recorder, make sure that there is enough disk memory for the recording. |
2. |
Always remember to mark the audio tapes with the date, name of the school and teacher, and class number. You may also speak to the tape / digital voice recorder and record the information listed above on tape. |
3. |
If you are using a cassette recorder, select a cassette tape of appropriate length. If you are recording, for example, a 40-minute lesson, it is advisable to use a 90-min tape so that your tape will not run out or stop in the middle of the recording, and so that you will not need to turn the tape over during recording. If you are using digital voice recorders (i.e. MD or MP3 recorder), there is no such concern. |
During Recording
4. |
Try to place the recorder on a steady table. |
5. |
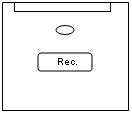
If you are recording individual presentations, you could put a table in front of the presenter and place the recorder on the table. |
6. |
If you are recording pair or group interactions, you can arrange the groups to sit at adjacent sides of the table and put the recorder between them to capture the voices of all the students. |
 |
 |
Individual Presentation |
Pair / Group Interaction |
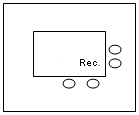
| Key: Rec. = Recorder |
7. |
If you need to record a lot of presentations / interactions in one long session, remember to keep the timing in mind. Be sure to turn the cassette tape over after about 25/28 mins of recording (if you are using a 60-min tape) and turn the tape before a new presentation / interaction begins, so that you can ensure that the tape will not run out during recording. |
After Recording
8. |
After recording all the presentations or interactions, you can put the recordings in a secure place. |
9. |
Rewind the cassette tapes. Put the tapes in order with your own coding system. If you are using a digital voice recorder, you can save the sound files onto a computer / or ask students themselves / the technicians at school to save the files onto a computer for you. |
| Note: Students can also be encouraged to take turns to record each other. This involves them and leaves the teacher free to concentrate on assessment. |